A reader asked me the other day how I added the dark feathered border to my photographs, so I thought I would write about it today.
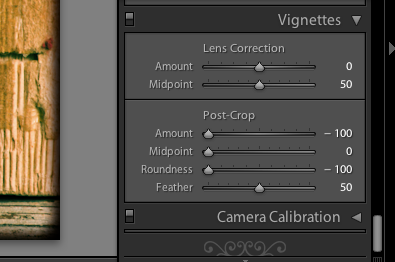
I usually use my Adobe Lightroom 2 computer program and simply use the options under "Vignettes" to add my desired border.

However, if you don't have Adobe Lightroom 2, you can use Photoshop. It takes a few more steps, but it is still fairly simple.
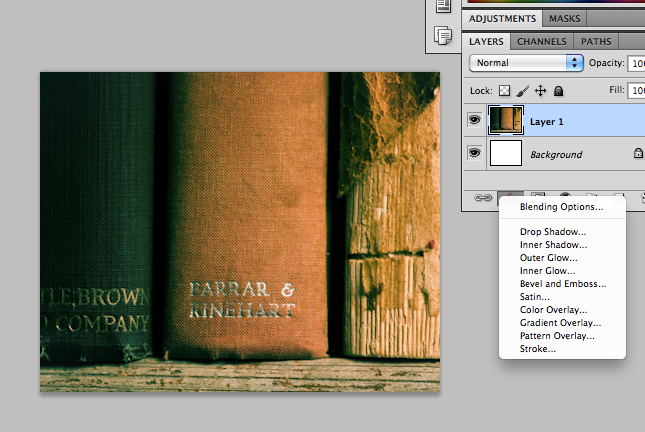
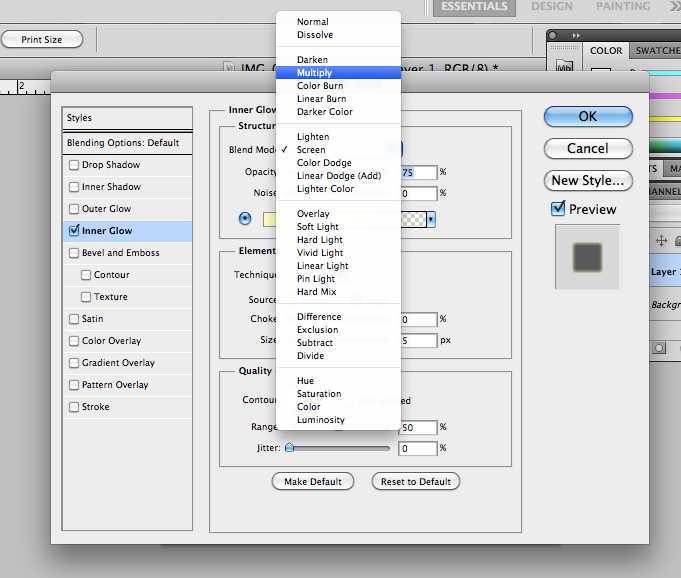
First you must have the photograph you desire to border on a layer apart from your background. You can do this by simply cutting the image out and repasting it. From here, click the fx option on the bottom lefthand of your layers window (it's the one next to the infinity sign looking icon). Once you have the fx window open, you need to check the box to add an inner glow and set the blend option to multiply.


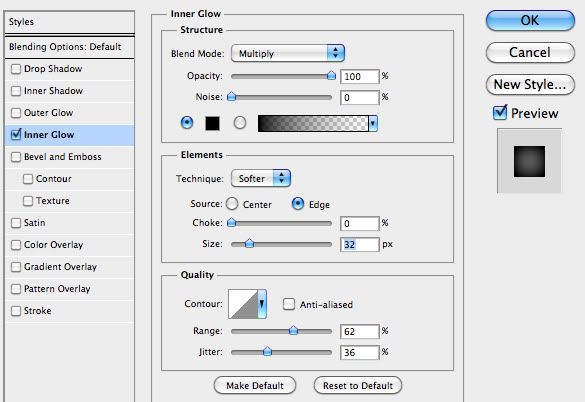
The standard color on my Photoshop is yellow, so I simply changed the color to black, and set my opacity 100. You also want to set the source option to edge. Then simply play around with the choke, size and range options till you figure out a border style you're happy with.

The follow images are my before and after. Although a very subtle change, the border will be a lot more drastic on bright photographs.


I know the images on this post are relatively small, so I set up the images to open in a new window if you click on them!
Hope this helps anyone trying to figure out how to border their images.
Depth of field refers to the distance between the subject and its foreground and/or background. It can also be thought of as how sharp the subject looks relative to its surrounding.
There are two main types of D.O.F., a shallow depth of field and a larger depth of field. Everything else lies somewhere between the two.
A shallow depth of field is when your subject or focal point is the only part in the photograph that is in focus, while your background and/or foreground is blurred. This is very commonly used in portrait photography. The closer you are to your subject the smaller D.O.F. you will have.

In this image, I was close to my subject, Selina, so I could blur the building in the background, which ended up barely appearing in the photograph.
Another example is the following image, in which I zoomed in and focused on the butterfly. There is a bit more detail in this photograph, but if I had zoomed in more or gotten closer, the background would have been completely blurred.

Macro lenses are great for achieving a blurred effect because they allow you to get closer to a subject and therefore have a more shallow depth of field.
Telephoto lenses are also great when you're trying to achieve a shallow depth of field because the further you zoom in the smaller your aperture becomes. However, it is harder to achieve a deeper depth of field with these lenses.
A deep depth of field is one in which the entire photograph is sharp. The more crisp details there are in a photograph the greater depth of field you have. This is often used in landscape photography and can be achieved by closing your aperture to its lowest f-stop, usually f2.8 or f3.5. In other words, zooming out or decreasing the magnification to create a crisper image.

In the photograph above I was using the same lens as in the first, but I was completely zoomed out and had a low f-stop, which created a deeper depth of field or more detail in the photograph. The same is true for the forest image below. In both, you can see the details in the foreground, background and subject. Everything is crisp, every detail is there. You can see the cracks on the wall and the furthest tree.

Both types of depth of field are important and both can be used to photograph anything. It is simply up to you to decide if only one detail in your image is important or if they all are and decide accordingly if you need a shallow or deep depth of field.
This is my first Wednesday Photo 101 blog post. Now, I know some of the stuff I post about photography may seem like easy concepts, or something everyone should already know. But the reality is, just as I don't know the complete basics about painting or knitting (nor any really even though I love doing both!), not everyone knows basic photography concepts, especially when dealing with manual use of SLR cameras.
So, I'm beginning with the main basics, one of which is shutter speed. Shutter speed refers to how much light your camera is letting into the frame; how long it takes your shutter to click shut between when you press your capture button and when it actually closes. Think of it as your capture time.
The shutter speed on your SLR camera can be controlled with the shutter speed dial (see image below), usually located on the top right of your camera. And will be displayed in increments such as: 1/800, 1/600, 1/400, 1/250, 1/200, 1/125, 1/60, 1/15, 1/10, 1, 2, 4, 8, 15, 20, 30. Whole numbers refer to complete seconds, while fractions are based off of one second, so a capture time of "1/15" is one-fifteenth of a second.

The less the light you have (the darker it is), the more light you'll need, so you'll want to have a slower shutter speed so you capture light for a longer period of time.
The more light you have in your surroundings (the sunnier it is) the less light you'll need to let in for the frame to come out well exposed. Therefore, you will want a faster capture time so less light comes into your frame.


(A fast shutter speed helped still-frame the bee in mid-flight (top) and to minimize the amount of light in my electricity pole photography midday (bottom).)
For a shutter speed of one second or more you will most likely require a tripod since any movement made during a long capture time will distort the image. With a tripod, a slow shutter speed can come in handy if you're trying to create movement in your image.
When you slide the shutter speed dial past the slowest increment your camera will say BULB. The BULB setting means that your camera will capture light for as long as you are pressing down your capture button.
While a fast shutter speed can help capture great still-frame moments, slower shutter speeds can be great because they're they create movement.


(Movement, which can be achieved with a slower shutter speed can be great in sports photographs (top), and night photography that captures lights (bottom).)
To learn a few basic shutter speed techniques click HERE.